Local Text To Speech feature
Quick setup guide with coqui-tts
The installation process can be difficult for non-developers. Also, the github repo will probably change a lot in the coming weeks.
To make the experience more immersive, you can enable the TTS feature by following this installation guide.
Thanks to the help of a user from the community, here's a lightweight TTS python script you can run on your computer to synthesize voices!
I've rushed the integration in eudaimonia to make sure it would be available fast. But I intend to develop it further.
Video guide:
I've made a step by step video guide to install the local TTS server on windows:
1. Miniconda:
You must first download and install miniconda to create a virtual environment.
Download Miniconda
1.5 [2025/07/08] NEW - Batch Files:
Thanks to Senorgif, two files are now available in the github repo. You can use them to more easily install and start local TTS on Windows.
After installing mini conda, you can run the "installation.bat" file to create the virtual env and its dependencies.
Then you'll be able to start the TTS feature by running the "start server.bat" file.
Make sure to replace in both .bat files the location of miniconda at the following line:
set "CONDA_PATH=%USERPROFILE%\miniconda3"
You can find this information by running the following command in the conda terminal (check the line: "base environment"):
conda info
If you encounter issues, check the full guide to install it manually.
2. Full guide:
Once miniconda has been installed, open the miniconda terminal
Create then activate your virtual environment:
conda create -n local-tts python=3.10 -y
conda activate local-tts
3. Python server:
Download or clone the local-TTS repo on github.
If you encounter an 'espeak' error, you need to install espeak-ng
Follow the installation instructions here.
Then restart your computer for the environment Path to be updated.
In the miniconda terminal, move inside the local-tts folder you've just downloaded:
cd "YOUR/LOCAL-TTS/PATH"
Install the dependencies:
pip install -r requirements.txt
Then start the server on the port you want:
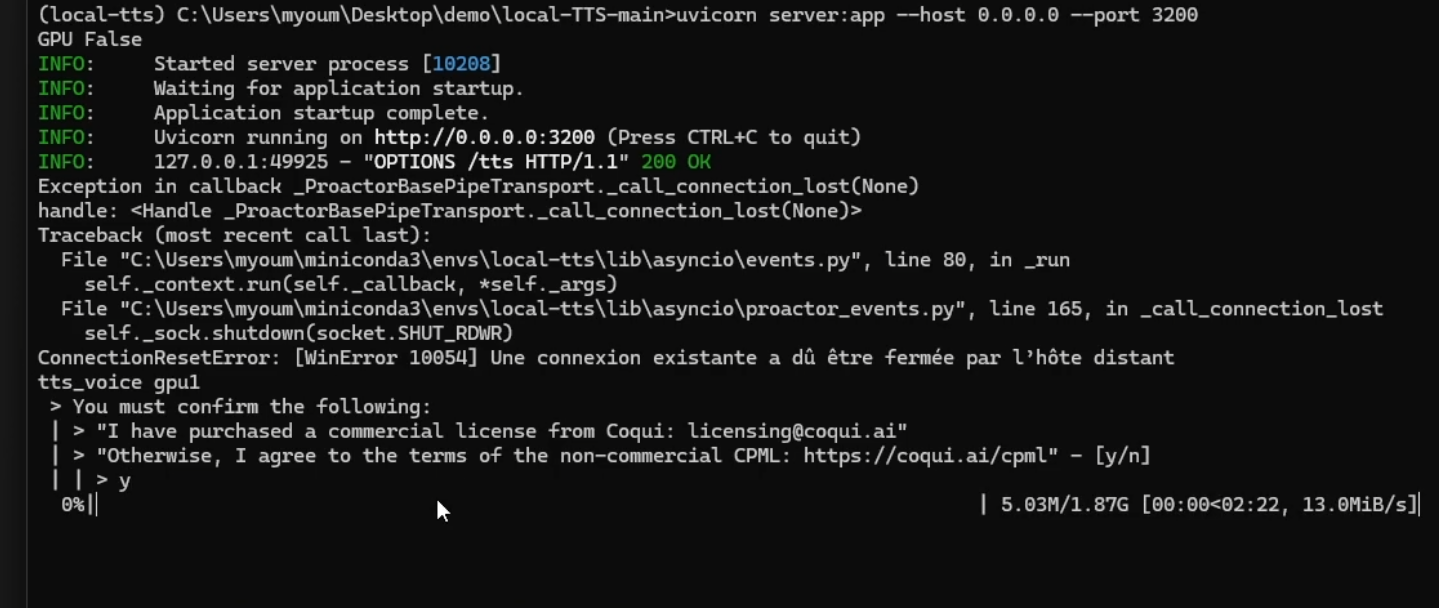
uvicorn server:app --host 0.0.0.0 --port 3200
Once you see this in your terminal, it means TTS is ready.

3.5. Errors:
If your GPU is not detected (in the image below you can see: GPU False), or have a torch error, installing the following dependencies can solve the issue. Paste the following line in the conda terminal.
Replace cu118 with you CUDA version if needed, or with 'cpu' to use cpu only.

pip install torch torchvision torchaudio --index-url https://download.pytorch.org/whl/cu118
4. Eudaimonia:
You can now fill the TTS Server url in eudaimonia with: http://localhost:3200
The first TTS request can take time since you'll need to download and load the model.
- CPU: fast and light can run on the cpu alone
- GPU: Slightly slower and requiring ~4GB VRAM (from the GPU), but better quality and voice cloning capability
- Cloning: Clone a voice from an audio sample file. Uses GPU with ~4GB VRAM
For GPU (and cloning) you'll have to accept conditions in the conda terminal before downloading the model:
Don't forget that everytime you want to use the TTS feature, you'll have to start miniconda and activate your virtual env:
conda activate local-tts
cd [your_tts-folder_path]
uvicorn server:app --host 0.0.0.0 --port 3200
5. Voice cloning:
You can clone the voice of your choice by using an audio file. To get the best results, the voice sample must be clean and articulated, with low no no background noises.
The Nicole voice is an integrated example of voice cloning since this voice is avaiable with KokoroTTS (Github.)
Voice cloning uses the xtts_v2 model, so you need a GPU with ~4GB VRAM.
6. Uninstalling:
If you want to delete the created environment, you can easily do it by running the following commands in the conda terminal:
conda env list
conda remove -n local-tts --all
8. Runpod:
You can also use runpod for the TTS feature.
Follow the installation steps here.
Here is a short video guide to help you setup the TTS server on Runpod: